
POP Email Settings
- Non-SSL/TLS
- Incoming Server Name: sm-pop.popp.net
- Port Number: 110
- Outgoing Server Name: sm-smtp.popp.net
- Port Number: 25
- SSL
- Incoming Port Number: 995
- Outgoing Port Number: 465
- TLS
- Incoming Port Number: 110
- Outgoing Port Number: 587
IMAP E-mail Settings
- Non-SSL/TLS
- Incoming Server Name: sm-imap.popp.net
- Port Number: 143
- Outgoing Server Name: sm-smtp.popp.net
- Outgoing Port Number: 25
- SSL
- Incoming Port Number: 993
- Outgoing Port Number: 465
- TLS
- Incoming Port Number: 143
- Outgoing Port Number: 587
Alternate Outgoing E-mail Server (Non-SSL/TLS)
If you’re using the alternate e-mail server, you can use the following:
- Outgoing Server Name: sm-smtpalt.popp.net
- Outgoing Port Number: 567
Internet Message Access Protocol, or IMAP, works differently because even though e-mail messages are downloaded and stored locally on your computer, they also remain on the e-mail server until you permanently delete them. The benefit to using IMAP is the ability to sync your e-mail messages and subfolders across all devices. However, you will need to monitor your POPP mailbox size or purchase increased storage if you run out of space.
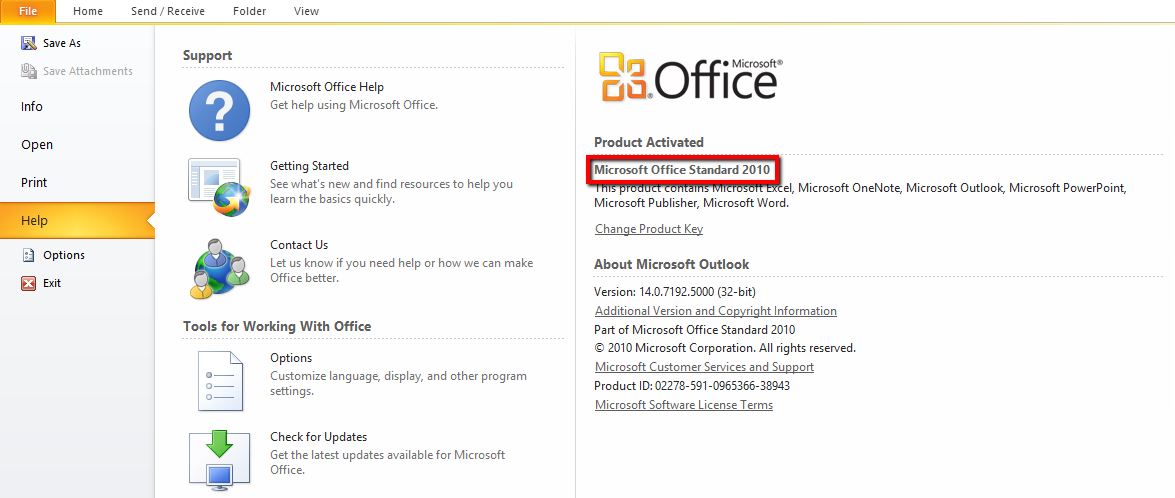
Confirm Your Version of Outlook
- Select File > Office Account
- You will see your version on the right-hand side – see example of an Office 365 product below
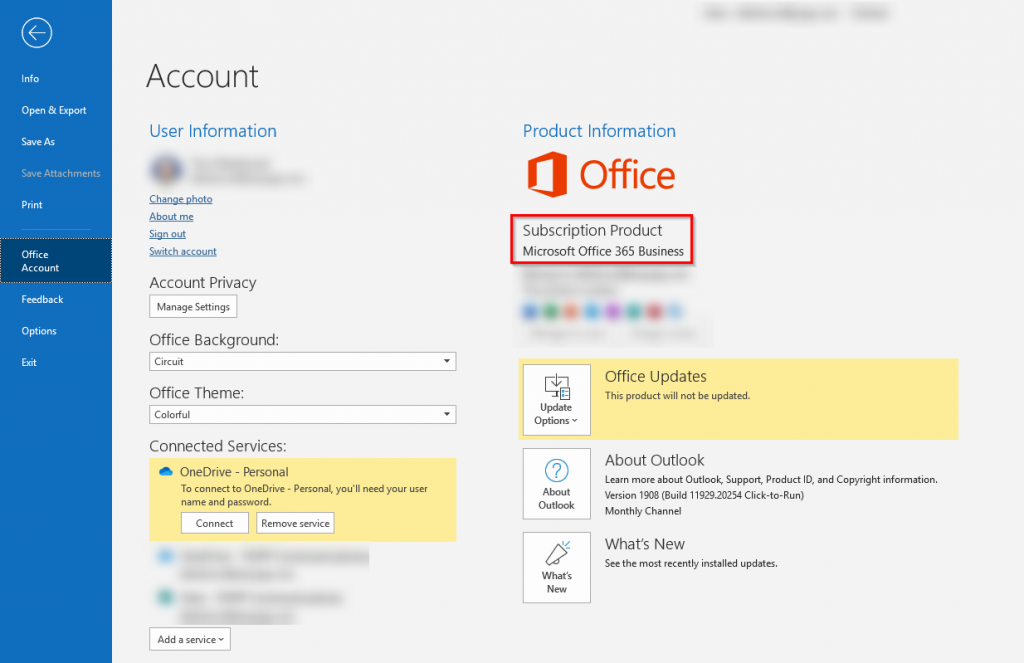
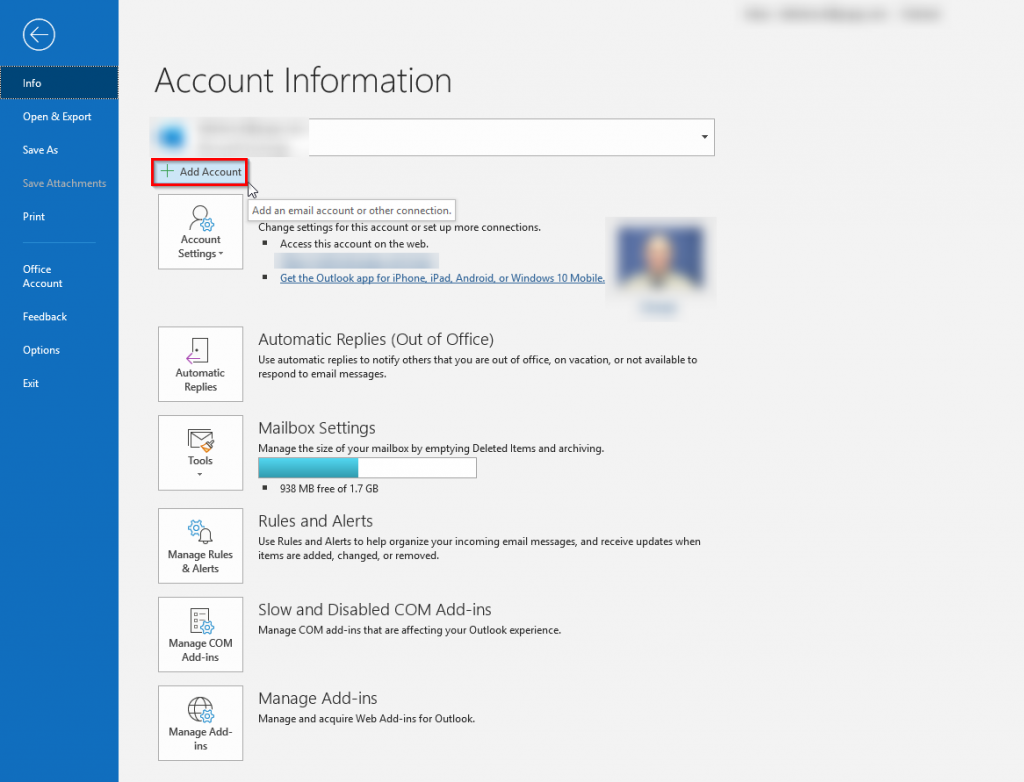
Outlook 2019 or Office 365
- Select File > Add Account
2. Enter your e-mail address
3. Select Advanced Options and check Let me set up my account manually
4. Select Connect. Please allow several minutes for Outlook to add the account.

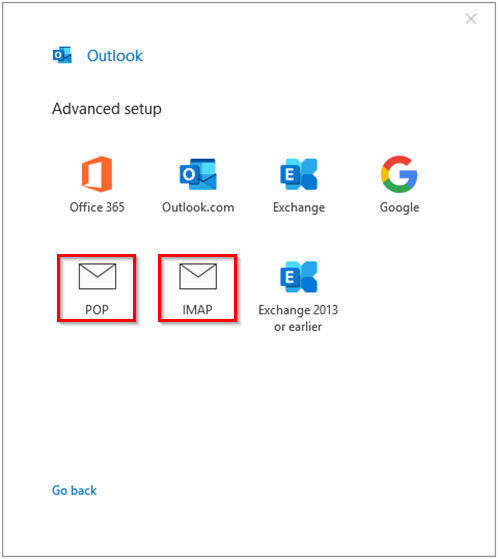
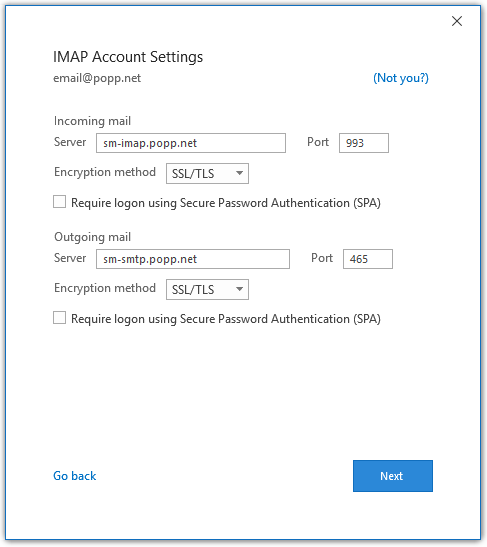
5. Select POP or IMAP
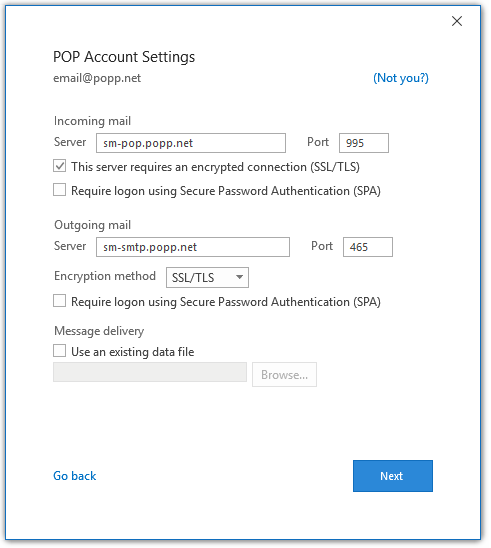
6. Incoming mail settings:
- POP Server: sm-pop.popp.net and Port 995
- Check the box for This server requires an encrypted connection (SSL/TLS)
- IMAP Server: sm-imap.popp.net and Port 993
7. Outgoing mail settings:
- Server: sm-smtp.popp.net and Port 465
- Encryption Method: SSL/TLS
8. Select Next
9. Enter your e-mail password and select Connect. Please allow several minutes for Outlook to add the account.
10. You will receive a message indicating the account has been successfully added. Select Done.
If for any reason you have trouble with the above instructions, below is an alternate method for adding an e-mail account to Outlook:
- Exit or close out of Outlook
- Open the Start menu on your computer and type: Control Panel
- Open the Control Panel app
- If your view is set to large or small icons, select the Mail (Microsoft Outlook) icon. Otherwise, select User Accounts > Mail (Microsoft Outlook).
- Select the Email Accounts button
- Select New
- Select Manual setup or additional server types
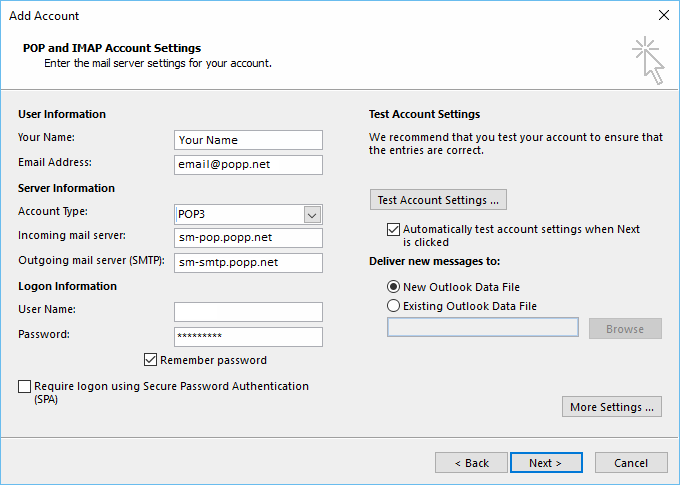
- Select POP or IMAP
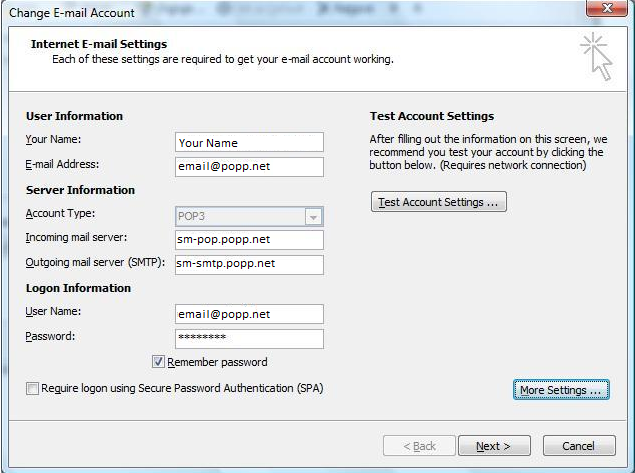
- User Information:
- Your Name: enter your name
- Email address: enter your email address
- Server Information:
- Account type: select POP3 or IMAP
- Incoming mail server:
- POP3: sm-pop.popp.net
- IMAP: sm-imap.popp.net
- Outgoing mail server (SMTP): sm-smtp.popp.net
- Logon information
- User Name: your full e-mail address
- Password: your e-mail password
- Select the More Settings button
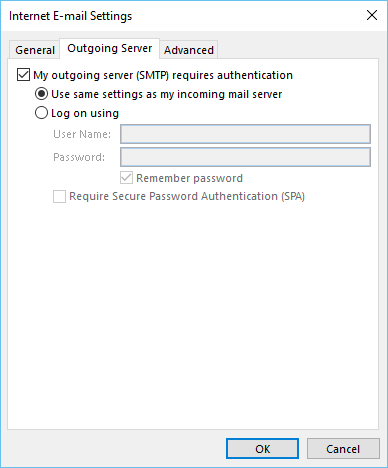
- Select the Outgoing Server tab and enable the following:
- My outgoing server (SMTP) requires authentication
- Use the same settings as my incoming e-mail server
- Select the Advanced tab and update the following (note the port numbers are different depending if you are using POP or IMAP):
- Incoming server (POP3): 995
- This server requires an encrypted connection (SSL/TLS): check the box
- Incoming server (IMAP): 993
- Select SSL/TLS from the “Use the following type of encrypted connection” drop-down menu
- Outgoing Server (SMTP): 465
- Select SSL/TLS from the “Use the following type of encrypted connection” drop-down menu
- Select OK to apply changes
- Select the Next button near the bottom-right corner. Outlook will test the account settings before saving the account. If your account does not sync, please contact us.
- After the successful test message appears, select Close.
- Select Finish
- Select Close to exit the e-mail accounts window
- Select Close to exit the mail setup window
Confirm Your Version of Outlook
- Select File > Help to view your version of Outlook as shown below
Outlook 2010, 2013, 2016
- Select File > Account Settings > Account Settings
- With the email account highlighted, select Change
- Within the Server Information section, note the Account Type setting of either POP3 or IMAP, then update the following:
- Incoming mail server:
- If POP3: sm-pop.popp.net
- If IMAP: sm-imap.popp.net
- Outgoing mail server (SMTP) [POP or IMAP]: sm-smtp.popp.net
- Incoming mail server:
- Select More Settings
- Select the Outgoing Server tab and enable the following:
- My outgoing server (SMTP) requires authentication: enable
- Use the same settings as my incoming mail server: enable
- Select the Advanced tab and update the following
- Incoming server:
- If POP: 995
- If IMAP: 993
- If Outlook 2010-2013:
- This server requires an encrypted connection (SSL): check to enable
- If Outlook 2016:
- Use the following type of encrypted connection: select SSL
- Outgoing Server (SMTP) [POP or IMAP]: 465
- If Outlook 2010-2013:
- This server requires an encrypted connection (SSL): check to enable
- If Outlook 2016:
- Use the following type of encrypted connection: select SSL
- If Outlook 2010-2013:
- Incoming server:
- Select OK
- Select Test Account Settings… near the top-right corner. If the account does not sync, please contact us.
- After the successful test, select Next near the bottom-right corner, then select Finish. Select Close for any additional open windows.
Confirm Your Version of Outlook
- Select File > Help to view your version of Outlook as shown below
Outlook 2007
- Select Tools > Account Settings
- With the email account highlighted, select Change
- Within the Server Information section, note the Account Type setting of either POP3 or IMAP, then update the following:
- Incoming mail server:
- If POP3: sm-pop.popp.net
- If IMAP: sm-imap.popp.net
- Outgoing mail server (SMTP) [POP or IMAP]: sm-smtp.popp.net
- Incoming mail server:
- Select More Settings
- Select the Outgoing Server tab and enable the following:
- My outgoing server (SMTP) requires authentication: enable
- Use the same settings as my incoming mail server: enable
- Select OK
- Select the Advanced tab and update the following:
- Incoming server:
- If POP: 995
- If IMAP: 993
- Use the following type of encrypted connection: SSL
- Outgoing Server (SMTP) [POP or IMAP]: 465
- Use the following type of encrypted connection: SSL
- Incoming server:
- Select Test Account Settings… near the top-right corner. If the account does not sync, please contact us.
- After the successful test, select Next near the bottom-right corner, then select Finish. Close any additional open windows.
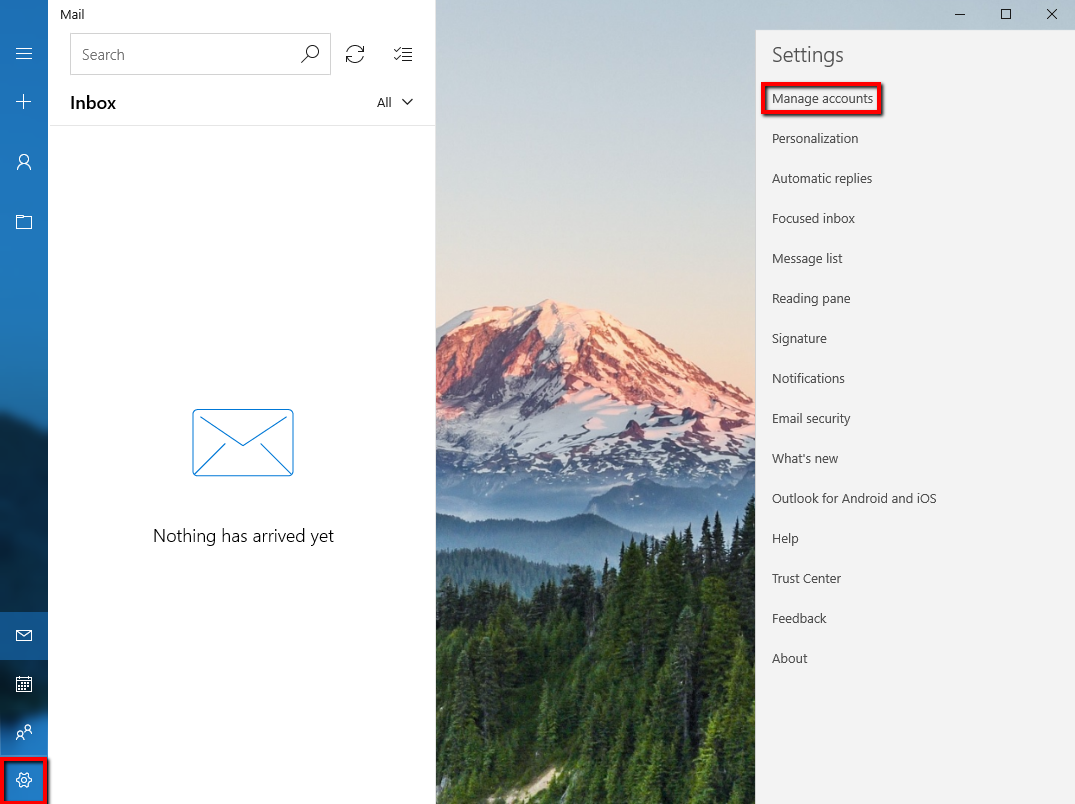
Windows 10 Mail App
- Select the settings icon (bottom-left corner)
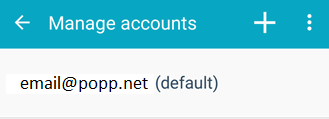
- Select Manage Accounts (right side of screen)
- Select your email account
- Select Change mailbox sync settings
- Select Advanced mailbox settings near the bottom
- Update the mail server information as follows:
- Incoming mail server: sm-pop.popp.net
- Outgoing mail server (SMTP): sm-smtp.popp.net
- NOTE: If you’re currently using smtpalt.popp.net, update to: sm-smtp.popp.net
- Verify that each of the following boxes are checked:
- Outgoing server requires authentication
- Use the same user name and password for sending email
- Require SSL for incoming email
- Require SSL for outgoing email
- Select Done at the bottom, then Save to apply changes
- If you receive an error message, select the Attention icon and re-type your password

*Please note that Microsoft has announced that Windows Essentials Suite reached end of support on January 10, 2017. Windows Live Mail is no longer available for download.
Windows Live Mail 2011
- Select the Accounts tab
- Highlight the email account on the left-hand side and select Properties
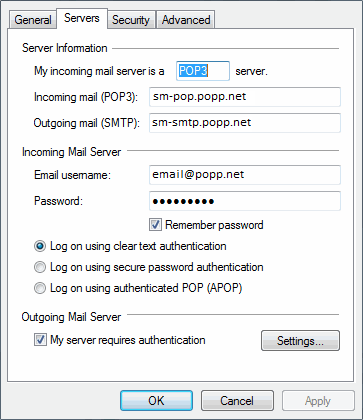
- Select the Servers tab
- Within the Server Information section, note the Account Type setting of either POP or IMAP, then update the following:
- Incoming mail server:
- If POP: sm-pop.popp.net
- If IMAP: sm-imap.popp.net
- Within the Incoming Mail Server section:
- Log on user authenticated POP (APOP): Check to enable
- Outgoing mail server:
- POP or IMAP: sm-smtp.popp.net
- Within the Outgoing Mail Server section:
- My Server Requires Authentication: Check to enable
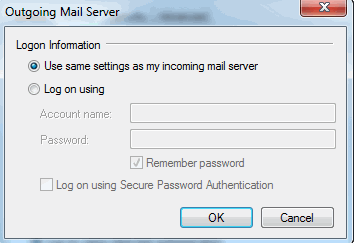
- Select Settings
- Select Use same settings as my incoming mail server
- Select OK
- Incoming mail server:
- Select the Advanced tab and update the Server Port Numbers as follows:
- Outgoing Server (SMTP): 465
- This server requires an encrypted connection (SSL): Check to enable
- Incoming Server:
- If POP: 995
- If IMAP: 993
- This server requires an encrypted connection (SSL): Check to enable
- Outgoing Server (SMTP): 465
- Select OK at bottom to apply changes
- The email account is now updated and ready for use
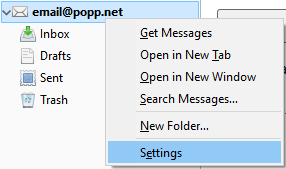
- In the left-side menu, right-click the email account and select Settings
- Select Account Actions near the bottom left of the screen, then select Add Mail Account
- Your Name: the entry in this field will be displayed on outgoing emails
- Email Address: email address
- Password: email password
- Select Continue
- Thunderbird will attempt to automatically configure the e-mail settings. The following items must be updated:
- Incoming Server Settings
- If POP:
- Incoming Protocol: POP
- Server Hostname: sm-pop.popp.net
- Port: 995
- SSL: SSL/TLS
- Authentication: Encrypted password
- If IMAP:
- Incoming Protocol: IMAP
- Server Hostname: sm-imap.popp.net
- Port: 993
- SSL: SSL/TLS
- Authentication: Encrypted password
- If POP:
- Outgoing Server Settings:
- POP or IMAP:
- Outgoing Protocol: SMTP
- Server Hostname: sm-smtp.popp.net
- Port: 465
- SSL: SSL/TLS
- Authentication: Encrypted password
- POP or IMAP:
- Username: enter the full e-mail address for incoming and outgoing servers
- Select Done
- Incoming Server Settings
- Select the Outgoing Server (SMTP) section and set the new outgoing server as the default
- Select OK to close the window
- Send an e-mail from Thunderbird and confirm it appears in the Sent folder
- POPP technical support will re-synchronize sent items to Thunderbird in order for the sent items to load
- To resolve a conflict with Thunderbird moving deleted messages, POPP technical support will assist with the following:
- Close Thunderbird
- POPP will move the default Trash folder to a Deleted Items parent folder and exit upon completion
- Re-open Thunderbird. There is now a Deleted Items folder, and a Trash subfolder.
- Right-click on the mailbox, select Settings
- Select Server Settings
- Within the middle section on where to move deleted messages, select the option for Deleted Items > Trash, then select OK
- Close Thunderbird
- Select Settings
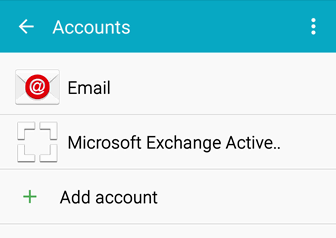
- Select Accounts
- Select Email
4. Select Settings
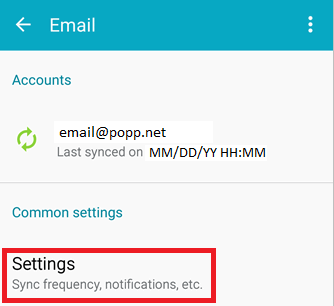
5. Select the email account
6. Scroll to the bottom and select More Settings
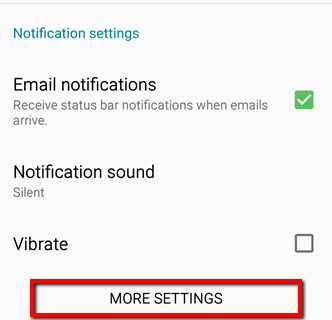
7. Scroll to the bottom to the Server Settings section
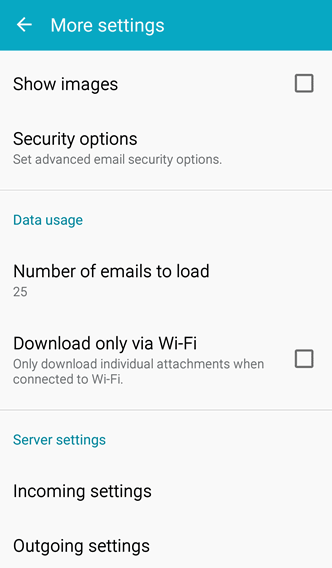
8. Select Incoming Settings
- If POP3, enter:
- Server: sm-pop.popp.net
- Security type: SSL
- Port: 995
- Delete email from server: keep your default setting enabled
- If IMAP:
- Server: sm-imap.popp.net
- Security type: SSL
- Port: 993
- Delete email from server: keep your default setting enabled
- Select Done
- Select Outgoing Settings (same for POP and IMAP)
- Server*: sm-smtp.popp.net
- Security type: SSL
- Port*: 465
- Require sign-in: enable
- Username: email address
- Password: email password
- Select Done
*If using the alternate e-mail server, use the following: - Outgoing Server Name: sm-smtpalt.popp.net
- Outgoing Port Number: 567
- Exit the Settings area
Mac Mail (Version 10 and higher)
The latest Mac Mail version will allow you to overwrite your existing e-mail server settings. However, due to a known issue with the Mail app on Mac devices, if the account is not deleted and recreated, the updated server settings will revert to their previous settings. Therefore, the following steps detail how to delete and recreate the account with the proper settings.
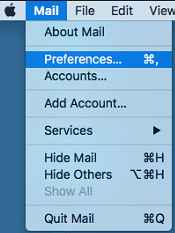
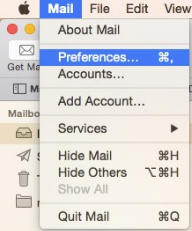
- With Mail open, select Mail in the top menu, then select Preferences
2. Select Accounts
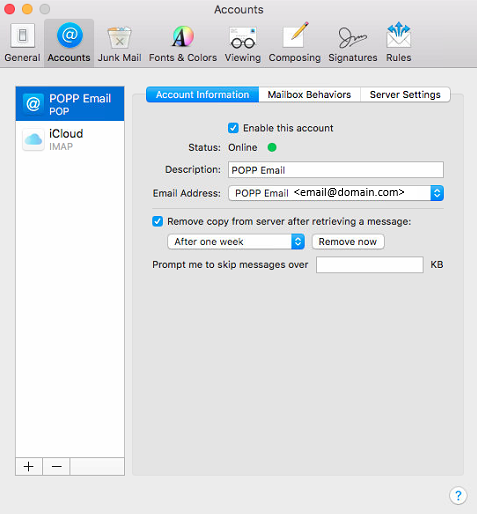
3. With the existing account highlighted, de-select the Enable this account checkbox within the Account Information menu. The account should move to the bottom of the accounts list.
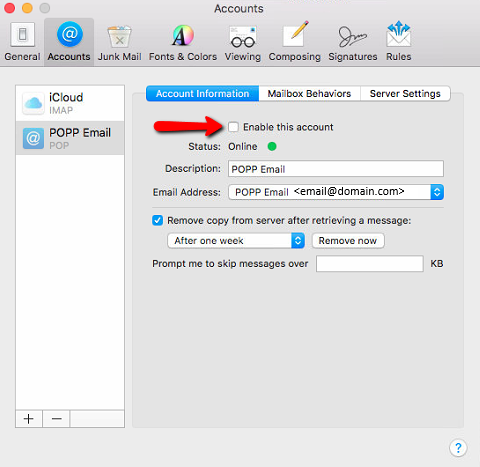
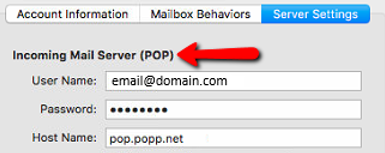
4. Select Server Settings and review the existing Incoming Email Server information. As in the example below, POP or IMAP will be listed in parenthesis. Take note of which protocol is currently in use.

5. Select the plus symbol (+) at the bottom of the account list to add a new account
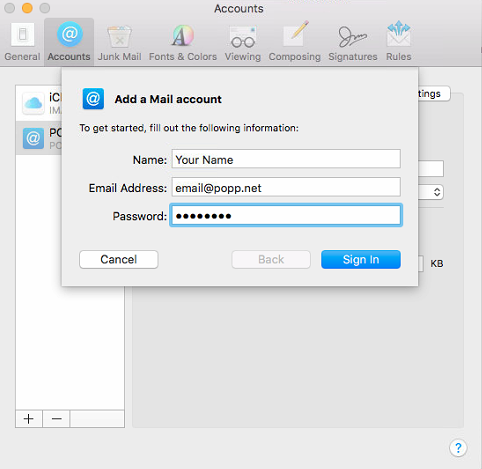
6. Select Other Mail Account
7. Enter name, email address and password. Select Sign In.
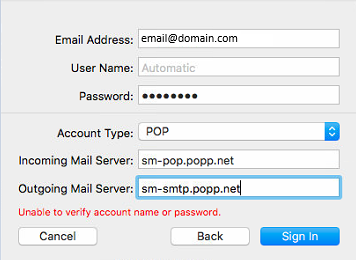
8. After selecting Sign In, you’ll be prompted to manually configure the email settings:
- Email Address: the email address will be populated
- User Name: Automatic (Uses the email address as user name)
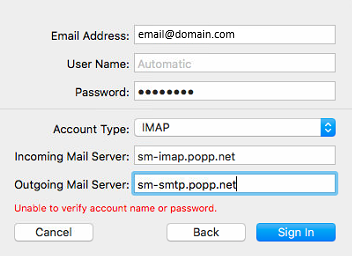
- Account Type: Select POP or IMAP to match the previous settings
- If POP, then Incoming Mail Server: sm-pop.popp.net
- If IMAP, then Incoming Mail Server: sm-imap.popp.net
- Outgoing Mail Server (POP or IMAP): sm-smtp.popp.net
Disregard the message Unable to verify account name or password – select Sign In.
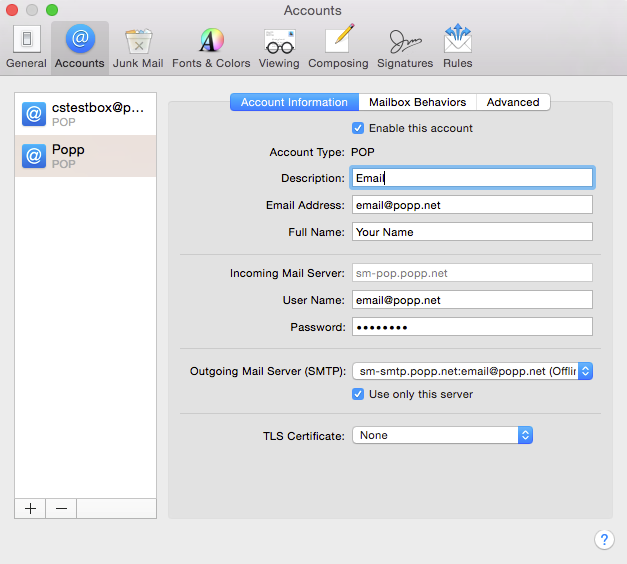
9. The new email account will now appear in the account list. Select the new account, then select Server Settings.
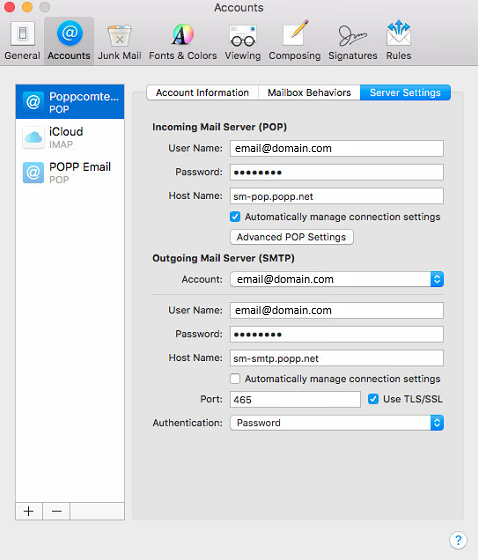
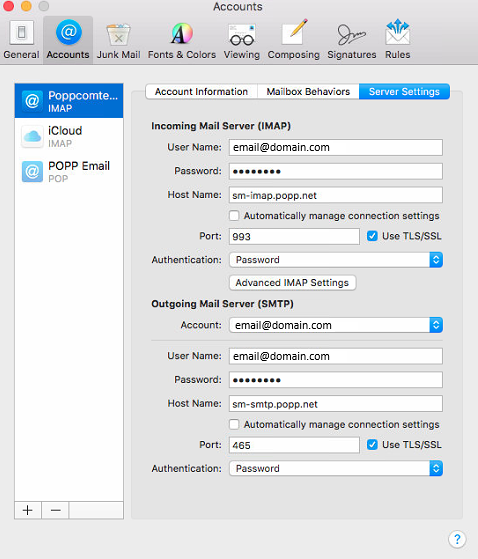
10. De-select the Automatically manage connection settings checkbox, and verify the following settings:
- Incoming Mail Server:
- If POP:
- Use TLS/SSL: enabled
- Port: 995
- If IMAP:
- Use TLS/SSL: enabled
- Port: 993
- Authentication: update to Password
- If POP:
- Outgoing Mail Server (SMTP):
- Port: update from 25 to 465
- Use TLS/SSL: update to enabled
- Authentication: update to Password.
- Mail will automatically enable MD5-Challenge Response – this will function, but may slow e-mail synchronization/delivery.
- Select Save. Mail will verify the settings.
11. Close out of the window and send a test email to confirm emails can successfully be sent.
12. The email account setup is complete and ready to use.
Mac Mail (Version 9 and lower)
Mac Mail does not allow the existing incoming mail server to be modified, therefore a new email account will have to be created.
1. With the default mail program open, select Mail in the top-left corner, then select Preferences
2. Select Accounts
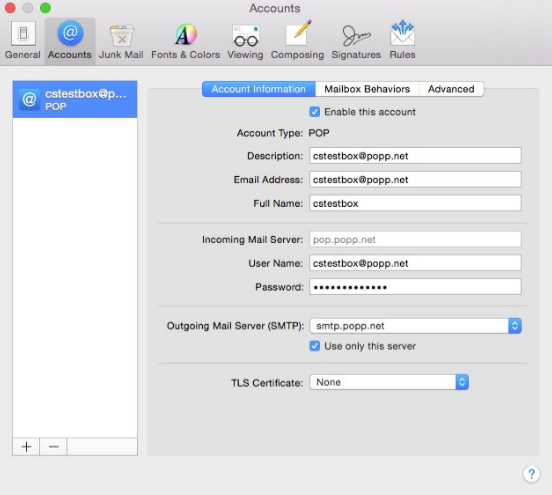
- With the existing account highlighted, de-select the Enable this account checkbox within the Account Information section. The account should move to the bottom of the accounts list.
- Select Server Settings and review the existing Incoming Email Server information. As in the example below, POP or IMAP will be listed in parenthesis. Take note of which protocol is currently in use.
3. Select the plus symbol near the bottom-left window to add a new account
4. Select the option for Other Mail Account
5. Enter name, email address and password
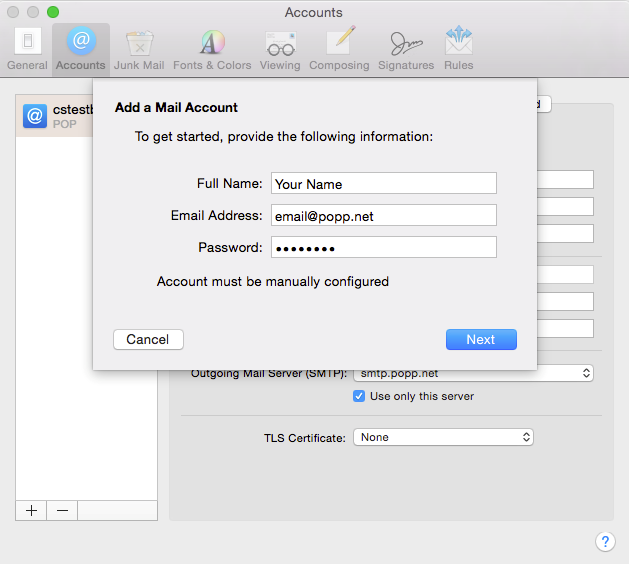
6. After selecting Next, you’ll be prompted to manually configure the email settings
- Account Type:
- Incoming Mail Server:
- If POP: sm-pop.popp.net
- If IMAP: sm-imap.popp.net
- Incoming Mail Server:
- User Name: email address
- Password: email password
- Select Next
- Incoming Port:
- POP: 995
- IMAP: 993
- Use SSL: enable
- Authentication: Password
- Select Next
7. The new email account will now appear in the left-hand side of the screen.
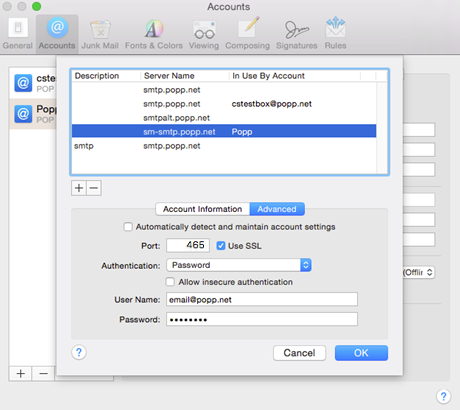
8. In the Outgoing Mail Server (SMTP) dropdown menu, select Edit SMTP Server List…
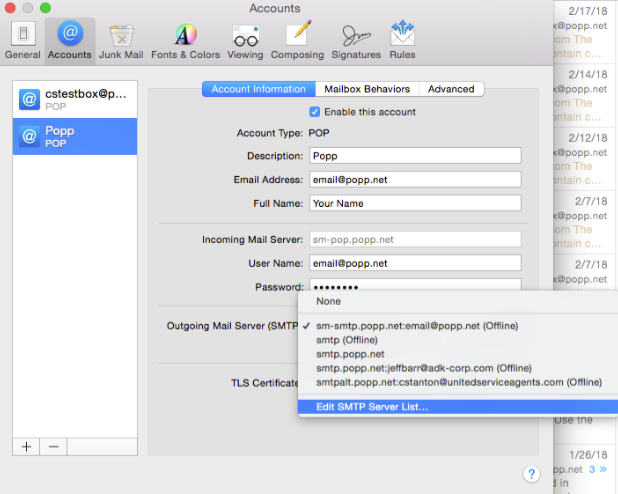
9. Highlight and modify the settings for the existing mail server:
- Automatically detect and maintain account settings: de-select
- Outgoing Mail Server (POP or IMAP): sm-smtp.popp.net
- Port: 465
- Authentication: Password
- User Name: email address
- Password: email password
- Select OK to apply changes
10. Close out of the window and send a test email to confirm the message was successfully sent
11. The new email account is created and ready for use
iPhone/iPad
1. Open Settings
2. Select Accounts & Passwords
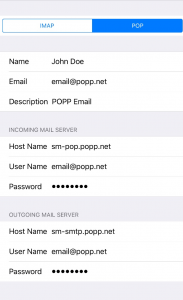
3. Select Add Account > Other > Add Mail Account:
- Name: this field will be displayed on outgoing emails
- Email: email address
- Password: email password
- Description: used to identify email accounts on the device (i.e. POPP email, etc.)
4. Select Next in the top-right corner to continue
5. IMAP is selected by default in the top-left corner – POP may alternately be used
- NOTE: Using POP will conserve email storage space if emails with large attachments are frequently sent/received.
6. Incoming Mail Server settings:
- Host Name:
- If IMAP: sm-imap.popp.net
- If POP: sm-pop.popp.net
- User Name: email address
- Password: email password
7. Outgoing Mail Server:
- Host Name (IMAP or POP): sm-smtp.popp.net
- User Name: email address (required)
- Password: email password (required)
8. Select Next in the top-right corner to continue
9. The account will verify the email server settings
10. The account is now visible in Settings > Accounts & Passwords. Select the account, then select the account again to review its properties.
11. At bottom, select Advanced Settings
- Under Incoming Settings:
- Use SSL: enabled
- Authentication: update to Password
- Server Port:
- If IMAP: 993
- If POP: 995
- Select Back in top left corner
12. Select the Outgoing Email Server (sm-smtp.popp.net)
- Use SSL: enabled
- Authentication: update to Password
- Server Port: 465
- Select Done – the account will verify the settings
13. Upon completion, select Done again. The account will complete the setup.